-
Recent Posts
Top Posts & Pages
Categories
- CSOM (3)
- Exchange Online (2)
- Nintex Workflow for Office 365 (4)
- REST API (1)
- Salesforce Connector (1)
- SharePoint Online (8)
- Tools (2)
- Uncategorized (3)
Tags
- ADFS
- Authentication
- CSOM
- Docker
- DotNetOpenAuth
- error response
- Exchange Online
- Get an Item from a Dictionary
- Microsoft Remote Connectivity Analyzer
- Microsoft SharePoint
- Nintex Workflow for Office 365
- OAuth
- Office 365
- Office 365 Query List
- Office 365 Upload File
- OpenIDConnect
- Query XML
- Salesforce
- Salesforce Chatter
- Salesforce Connector
- SharePoint Online
- Single sign-on
- Site Collections
- SSO
https://remarkablemark.org/blog/2018/06/28/jest-mock-default-named-export/
Posted in Uncategorized
Leave a comment
How to: Stop & Remove all Docker containers & images
This command can help to remove all of Docker containers:
# Delete all containers
docker rm -f $(docker ps -a -q)
# Delete all images
docker rmi $(docker images -q)
MsOnlineClaimsHelper vs. SharePointOnlineCredentials
In case you’re wondering which approach to use for CSOM calls to SharePoint Online.
http://wp.sjkp.dk/msonlineclaimshelper-vs-sharepointonlinecredentials/
Posted in CSOM, SharePoint Online
Leave a comment
Tips for Query List in Nintex Workflow for Office 365
The query list action is useful for querying list items within the current site.
It makes a call to the SharePoint REST API using the current user who started the workflow, therefore if you would like to query a list with full permissions, you can place this action within an “App Step” action.

I have setup a custom list called “Book” which has book title, on sale & price:

Here’s how we can use Query List action to look for books that are on sale:
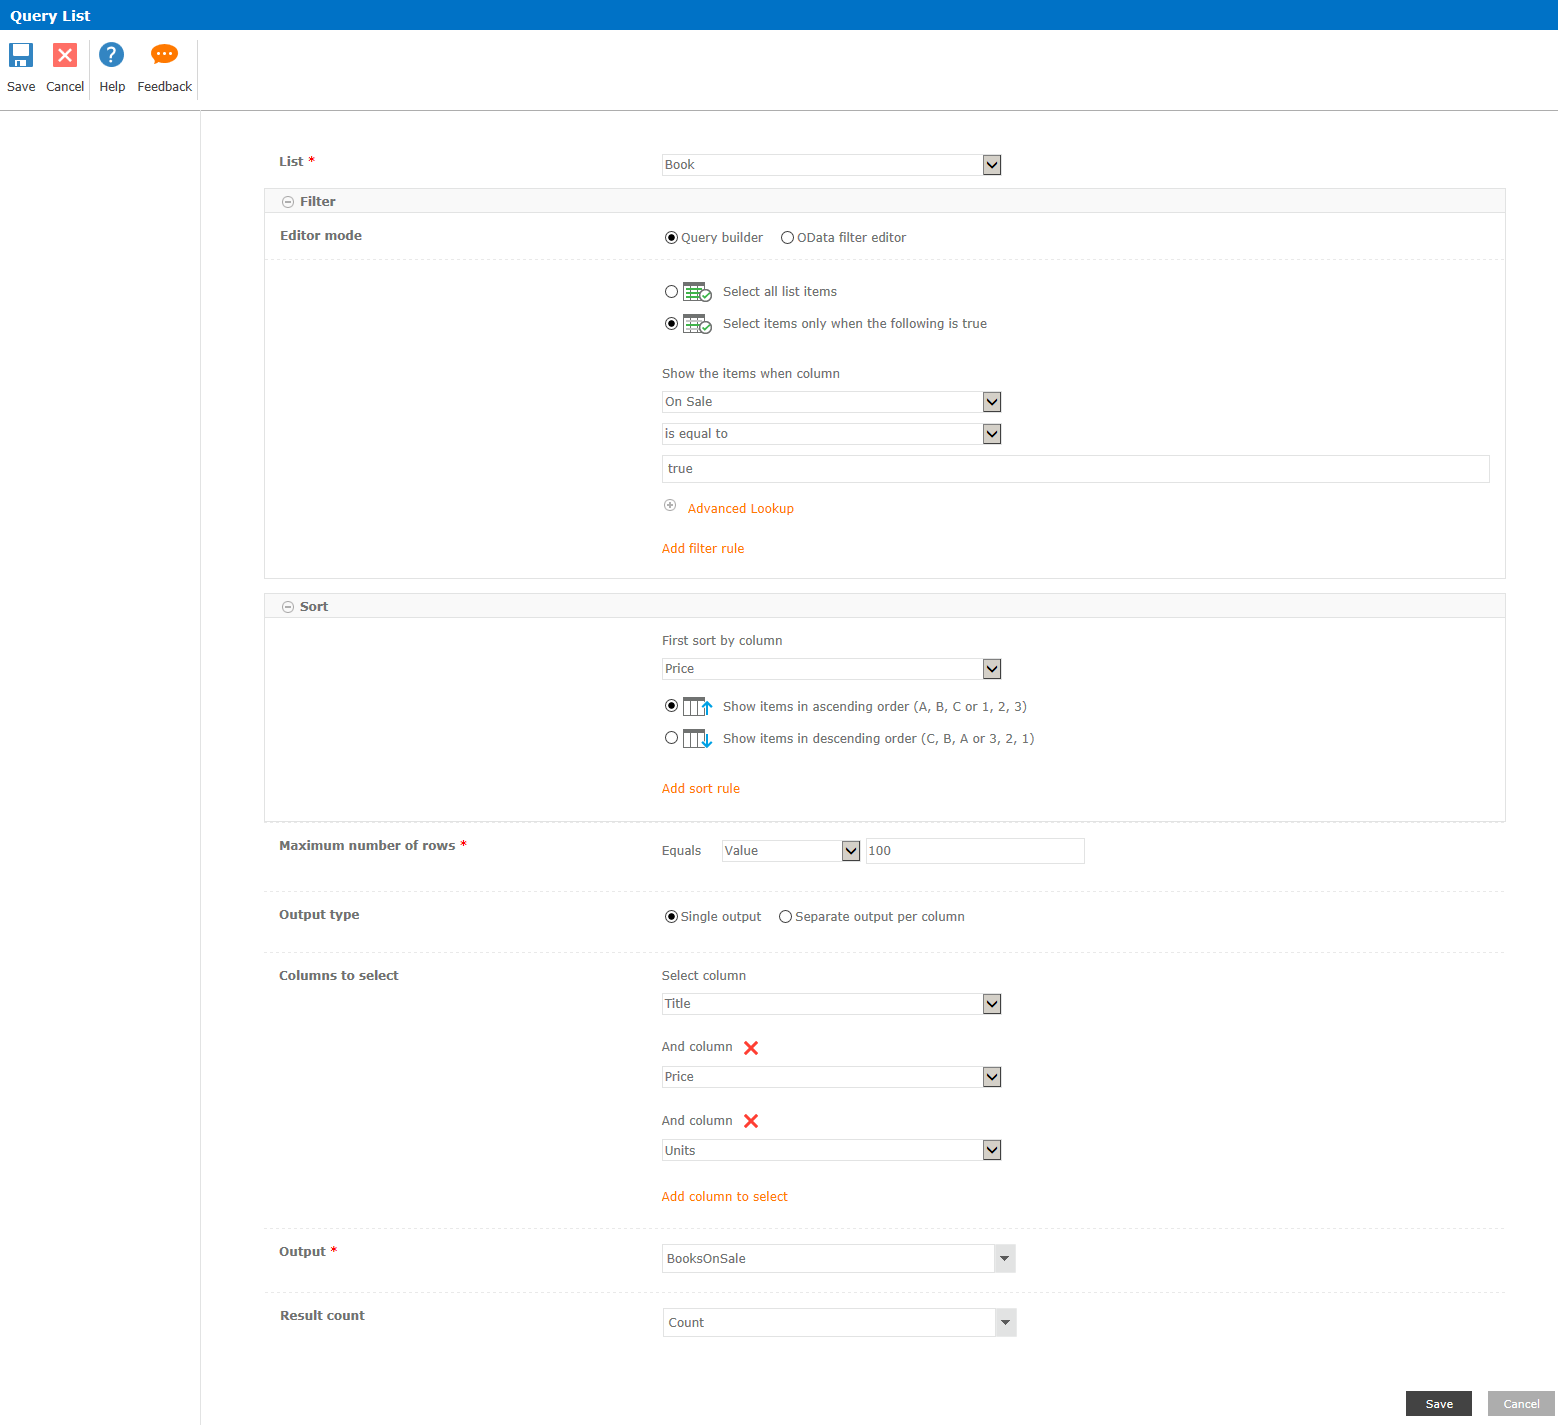
The response content, which will come back from a REST service is processed by this action based on the “Columns to select” and will be stored in the “Output” Collection variable.
Here’s how we can loop through the result stored in collection output “BooksOnSale” using a combination of actions like “For Each” and “Get an Item from a Dictionary”.

In the “For Each” action, we need to configure to retrieve from “BooksOnSale” Collection variable and the output to a Dictionary, which we have named it as “Book”.

In the “Get an Item from a Dictionary” action, you need to select the “Book” Dictionary variable, then specify the “Item name or path” as the internal name of the list’s column. Here’s a sample of how we query for the Title column and store it to text variable. Repeat the same steps to retrieve Units and Price.

The result:

Tips:
- Result count can be used to determine if there are any matches based on the query and combined with “Run If” action, to evaluate if you need to run a set of actions based on the result count value.
- This action has better performance as it is faster compared to the “Office 365 query list” as it uses REST API. It is limited to query items within the current site and does not allow querying items in root site/sub sites or other Office 365 tenants.
- You don’t have to specify your Office 365 credentials
- You can use App-Step to run with elevated privileges when querying list items if items have custom permissions
- You can filter using extended fields for lookup columns (for example, filter based on a User’s Name/Email Address)
Sample workflow: Download here

Create Site Collections in SharePoint Online (CSOM)
The following assemblies (DLLs) are required:
Microsoft.SharePoint.Client.dll
Microsoft.SharePoint.Client.Runtime.dll
Microsoft.Online.SharePoint.Client.Tenant.dll
You can download the SharePoint Server 2013 Client Components SDK (http://www.microsoft.com/en-US/download/details.aspx?id=35585) to obtain the Tenant assembly
Source: http://www.vrdmn.com/2014/03/create-site-collections-with-csom-in.html
Code: https://gist.github.com/vman/9342224#file-createsitecollection-cs
Posted in CSOM, SharePoint Online
Leave a comment
CSOM / REST: How to avoid getting throttled or blocked in SharePoint Online
Read more on: https://msdn.microsoft.com/en-us/library/office/dn889829.aspx
The most common causes of per-user throttling in SharePoint Online are client-side object model (CSOM) or Representational State Transfer (REST) code that performs too many actions too frequently. With CSOM / REST, you can perform many actions with a single request. This makes it easy to exceed usage limits, which may cause per-user throttling.
For example, after migrating files to SharePoint Online, you run a custom CSOM or REST script to update metadata on the files. The CSOM/REST script is updating a large number of files at a very high frequency, which triggers throttling. Similarly, an autocomplete UI widget using REST services, making too many calls to lists during each end user operation, may also cause throttling, depending on what other operations are consuming resources at the same time.
What happens when you get throttled in SharePoint Online?
When a user exceeds usage limits, SharePoint Online throttles any further requests from that user account for a short period. All user actions are throttled while the throttle is in effect.
- For requests that a user performs directly in the browser, SharePoint Online redirects you to the throttling information page, and the requests fail.
- For all other requests, including CSOM or REST calls, SharePoint Online returns HTTP status code 429 (“Too many requests”), and the requests fail.
If the offending process continues to exceed usage limits, SharePoint Online may completely block the process; in this case, you may see HTTP status code 503 (“Service unavailable”), and they will notify you of the block in the Office 365 Message Center
Best practices to handle throttling
- Reduce the number of operations per request
- Reduce the frequency of calls
- Use incremental back off to reduce the number and frequency of calls until no more throttling occurs
Posted in CSOM, SharePoint Online
Leave a comment
Connect your business processes to Salesforce Chatter with Nintex Workflow
Nintex Workflow for Office 365 recently released the Salesforce Connector on Nintex Store which allows you to integrate your workflows with Salesforce easily.

Salesforce Connector
The pack contains these actions:
- Salesforce Chatter
- Post Feed
- Post File
- Post Poll
- Post Link
- Send Invitation
- Search Feeds
- Salesforce
- Create Record
- Update Record
- Delete Record
- Retrieve Record
- Query Record
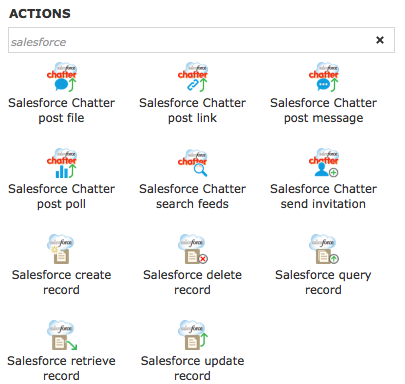
Salesforce Action List
In this post, we will discuss on how to configure each of the Salesforce Chatter actions.
Getting started:
You will need a registered account in Salesforce to fill in these details in each action:
- Username
- Password
- Security token
Tip: It is recommend to configure it with an account that doesn’t have password expiry so that you don’t have to revisit this section when the password has changed.

Salesforce credentials
Salesforce Chatter Post Message
You can use this action to post a message to your followers, group or specific user. The message supports hash tags so that you can put them into topics.
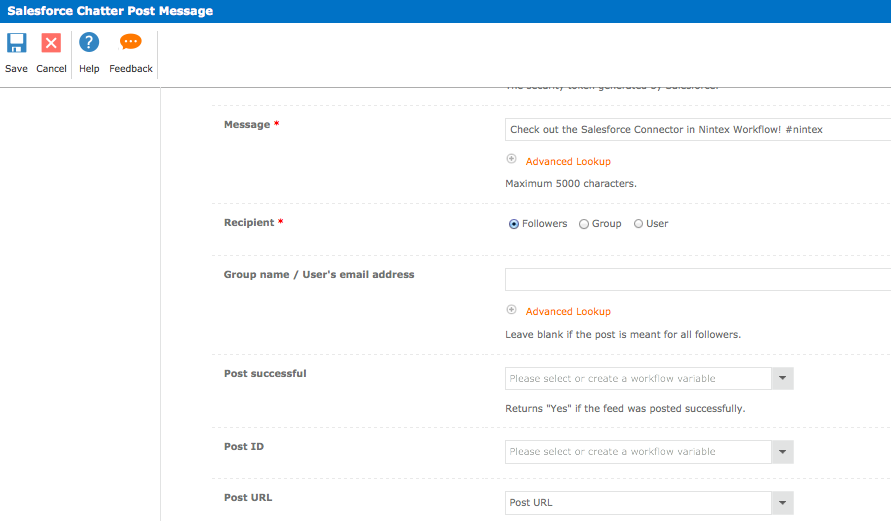
Salesforce Chatter Post Message
Salesforce Chatter Post Link
Similar to the post message action, it allows you to post a link feed type.

Salesforce Chatter Post Link
Salesforce Chatter Post File
Similar to the post message action, it allows you to post a file along with your message.

Salesforce Chatter Post File
Tip: If you would like to post images into Salesforce Chatter automatically, you can create a workflow in a Picture Library as a repository to sync images there with Salesforce and configure a List Workflow associated to this list to “Start workflow on item created” in the Workflow Settings, then configure the action’s “File to upload” field to “Current item”.
Caution: If you’re using the “Existing SharePoint content”, make sure it is a server relative URL or else the workflow wouldn’t be able to locate the file. Refer to the screenshot above for a sample of the server relative URL in the document library.
Salesforce Chatter Post Poll
This action allows you to post a poll on Salesforce Chatter. You need to specify 2 (minimum) to 10 (maximum) choices.

Salesforce Chatter Post Poll
Salesforce Search Feeds
Search for Chatter feeds by keyword.

Salesforce Chatter Search Feeds
Tip: Use the “Loop N Times” & “Do Calculation” action to read the results.
Salesforce Send Invitation
Send an invitation to your co-workers or customers to join your Salesforce organization.

Salesforce Chatter Send Invitation
Tip: Customer invitations requires some setup in your organization. Refer to the steps here. Salesforce will send an email to the “User to invite” with the links to join your Salesforce organization.
Results

Salesforce Chatter Sample Outcome

Salesforce Chatter Sample Workflow History
Workflow
You can download the site workflow designed in Nintex Workflow for Office 365.
Some information about the workflow:
- It is using the “Set Workflow Variable” action to specify the username, password & security token at the beginning to be reused in other actions – for simplicity – you should key in the values to the actual fields so that the password & security tokens are protected (masked)
- It uses the “Loop N Times” & “Do Calculation” to read the results from Salesforce search feeds results
Hope the sample workflow helps in designing your workflows 🙂
Tips for Query XML in Nintex Workflow for Office 365
The Query XML and Update XML actions were released in Nintex Workflow for Office 365 on 6th June.
- Query XML gives you the ability to extract data from an XML source (document / content)
- Update XML gives you the ability to update data from an XML source (document / content)
In this post, I would like to share some tips on how we can retrieve information from the Fields XML returned by Office 365 Query List. The Office 365 Query List action allows you to retrieve metadata from your list and returns an array (dictionary) of Fields XML. You need to use the “Get an Item from a Dictionary” to read each list item’s Fields XML so that you can extract the information.
Below is a sample metadata XML that was extracted from one of the Fields XML with the help of “Get an Item from a Dictionary”.
<?xml version="1.0" encoding="utf-16"?>
<MetaDataCollection xmlns:xsd="http://www.w3.org/2001/XMLSchema" xmlns:xsi="http://www.w3.org/2001/XMLSchema-instance">
  <MetaData>
    <Key>ID</Key>
    <Counter>1</Counter>
  </MetaData>
  <MetaData>
    <Key>Title</Key>
    <Text>The Hunger Games</Text>
  </MetaData>
  <MetaData>
    <Key>Vendor_x0020_ID</Key>
    <Text>DZ1123</Text>
  </MetaData>
  <MetaData>
    <Key>Units</Key>
    <Number>40</Number>
  </MetaData>
  <MetaData>
    <Key>OnSale</Key>
    <Boolean>true</Boolean>
  </MetaData>
</MetaDataCollection>
With the XML, we know that the structure consist of
- MetaDataCollection
- MetaData
- Key
- {Type}: Returned based on field type, example Counter, Text, Number & Boolean
- MetaData
We can construct the XPath, to retrieve value for these fields:
- ID (Counter)
- /MetaDataCollection/MetaData[Key=’ID’]/Counter
- Title (Text)
- /MetaDataCollection/MetaData[Key=’Title’]/Text
- Vendor ID (Text)
- /MetaDataCollection/MetaData[Key=’Vendor_x0020_ID’]/Text
- Units (Number)
- /MetaDataCollection/MetaData[Key=’Units’]/Number
- OnSale (Boolean)
- /MetaDataCollection/MetaData[Key=’OnSale’]/Boolean
Workflow
Sample site workflow – this sample demonstrates on using the following actions:
- Office 365 Query List
- Used for retrieving list items properties
- Office 365 Upload File
- Used for uploading each list item’s fields XML to a document library to have a look at the XML & construct the XPath query for Query XML – this can be removed if you are familiar with the Fields XML structure returned by Query List
- Loop N Times
- Used for repeating the data extraction for each list item – the number of times the loop executes are based on the Query List output, “Result count”
- Get an Item from a Dictionary
- Used for retrieving the item of the current index from the array (dictionary)
- Query XML
- Used for retrieving the data from the current field XML with the help of XPath query
- Do Calculation
- Used for increasing the current index at the end of each loop

The workflow logs these data into history:
- ID
- Retrieved from FirstColumn (Dictionary output) using “Get an Item from a Dictionary”
- Title
- Retrieved from currentFieldXml using Query XML with the XPath query: /MetaDataCollection/MetaData[Key=’Title’]/Text
- Vendor ID
- Retrieved from currentFieldXml using Query XML with the XPath query: /MetaDataCollection/MetaData[Key=’Vendor_x0020_ID’]/Text
- Units
- Retrieved from currentFieldXml using Query XML with the XPath query: /MetaDataCollection/MetaData[Key=’Units’]/Number
- OnSale
- Retrieved from currentFieldXml using Query XML with the XPath query: /MetaDataCollection/MetaData[Key=’OnSale’]/Boolean

List
The query list action is retrieving information from the Book list. Below is a screenshot of the list items and the design:

Book – List Items

Book – List Settings
Query list
The Office 365 query list configuration retrieves the list items’ properties. In sample configuration, I’ve specified to query for ID, Title, Vendor ID, Units and On Sale fields.
Note: The default view fields will be queried if you did not populate the fields to query

Office365 Query List
Get an Item from a Dictionary
There are 2 get items from dictionary used here to:
- Obtain the current item ID (using current index) of the FirstColumn (Dictionary output)
- Obtain the current field XML (using current index) of the FieldsXmls (Dictionary output)

Get item from dictionary
Take note of the “Item Name or Path” are specified as “({Variable:currentIndex})” where currentIndex variable increase by 1 at the end of the loop using “Do Calculation” action.
Query XML
The Query XML action gives you the ability to query information from the following sources:
- Existing SharePoint content
- This must be a server relative URL to a document library within the current site. If the document is located at “https://site.sharepoint.com/sites/workflow/test/Shared%20Documents/QueryResult-0.xml”, then the value should be /Shared%20Documents/QueryResult-0.xml
- Content
- This must be a XML content (string). The sample workflow is using this option with the text variable (currentFieldXml) populated from “Get an item from a dictionary”
- Current item
- This option is only available in a document library workflow and you can use this option to query the data from the current XML document that you’re running the workflow
With that, lets have a look at how retrieve the data for:

Query XML – Get Title
Incrementing the current index
At the end of the loop there is an action called “Do Calculation” to increase the current index by 1 before the next loop.

Do Calculation – Incrementing currentIndex
UPDATE:
There’s a new action called “Query List” in Nintex Workflow for Office 365 which is suitable for querying items within the current site. It has better performance when comes to reading the responses as you will process the JSON response data using “Get an Item from a Dictionary” instead of “Query XML”. Read more here.
How to use Nintex Workflow for Office 365: Exchange Online create calendar item
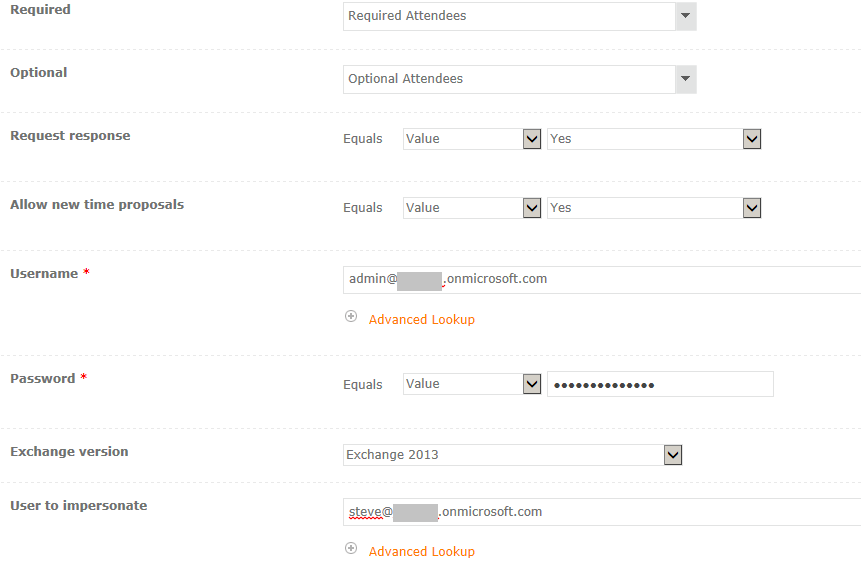
Before you begin, identify if the requirements include sending an invitation on behalf of a person in your organization. In this example below, we will discuss on using impersonation to send invitations on behalf of other users, with the scenario: “As an admin, I would like to send meeting invitations on behalf of Steve to Rachel & Danny.”
The design uses the “Build Dictionary” action to populate the dictionary inputs, Required attendees, Optional attendees before the “Exchange Online create calendar item” action.

Note that the pattern that was used when building the key and values for dictionary. There are ways to improve the design to suit dynamically populating the attendees using loops and I’ll post it up soon.


Next, configure the workflow with the meeting invitation details & the dictionary populated earlier.
Notes:
- The username specified here is admin@tenant.onmicrosoft.com and the user to impersonate is steve@tenant.onmicrosoft.com
- The password is for the username (admin@tenant.onmicrosoft.com)
- The admin must have ApplicationImpersonation role configured in order to impersonate as Steve to send out meeting invitation on behalf of him

![]()
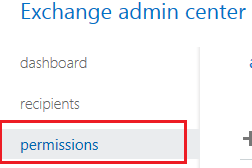
How to: Configure Exchange Online Impersonation
Go to Exchange admin center

Click on permissions tab on the left panel
Add a new admin role group. In the role tab, click on the + sign

Specify the role name “Impersonation”, add the ApplicationImpersonation role and add a member to this role. In the example below, I’m assigning application impersonation access to the admin account.
The
ApplicationImpersonationmanagement role enables applications to impersonate users in an organization to perform tasks on behalf of the user.

Confirm the role is added successfully

Next, you can perform actions on behalf of other users (eg: create calendar item)
Posted in Exchange Online
Leave a comment
